Preface
On my very first tramps, I used to eat muesli for breakfast, muesli for lunch, and muesli for dinner… I got bored and tired and realised that a yummy mix of dried fruits, seeds and nuts – aka scroggin mix – is a small step toward happiness. Indeed, eating better is good for both your body and your soul. Notice that the scroggin mix is a snack rather than a breakfast. Then I got a cooker to have a warm dinner. Commercial dehydrated/freeze dried sport meals like Backcountry Cuisine is an easy solution. A much cheaper way – but less nutritive – is to use all-in-one mixes or even better: make your own mixes.
Plastic waste is a critical point when it comes to choose food and challenging when thru-hiking. I avoid single use packages, prefer taking in bulk, and reuse plastic bags. Unfortunately, recycling is not common nation-wide in New Zealand so I didn’t bother looking for recyclable stuff. I preferred burnable packages so that I could light fire in huts. Also, biodegradable stuff like tea leaves or coffee ground could be buried, therefore reducing weight!
The (or at least my) reference book about tramping food is New Zealand Backcountry Cooking and the reference book about edible plants is A Field Guide to the Native Edible Plants of New Zealand by Andrew Crowe. I used Manuka and Kanuka leaves for my tea (even tastier with goji berries and dried apple pieces), moss and Rangiora (Brachyglottis Repanda) leaves as paper toilet. The large Rangiora leaves could also be used as paper when the intentions book is full and you run out of paper.
If you like to drink or eat many different things, don’t hesitate to take everything in small quantity, but too much is useless. Eat a smaller amount of food enhance digestion. Eating food too quickly or consuming to much in one go creates indigestion, gas and sometimes fatigue. However, I would prefer a kilogram of fine food than a kilogram of camera gear. It makes the walk more enjoyable. Plus the amount of food reduces along the track.
Gear & Gas
Cookers
JetBoil
I used a JetBoil Zip with the frying pan extension for ages and it worked very well. The recipes of this document which require cooking in camp are designed for the JetBoil.
Notes:
- One 380g canister (227g gas) is enough for 2 weeks in summer for boiling 2 meals and 1 tea every day.
- Even with a JetBoil, dry rice is long to cook. You can either boil longer or re-boil twice – 0, 10, 20 min – and wait 20 more minutes – 40 min in total. As comparison, mashed potatoes take 1 min to cook, 3 minutes for noodles and 14 minutes for pasta. Notice that precooked rice is too heavy and whole ingredients cook slower.
Multifuel
During my winter expedition, I used the Hexon Multifuel by Edelrid (EUR 113).

Specs:
- Multifuel:
- Liquefied petroleum gas (aka LPG or LP gas, f.i. butane, isobutane, and propane)
- White gas (f.i. gasoil)
- Kerosene (f.i. white spirit)
- Weight: 220 g w/o pump, 330 g w/ pump
Why this cooker? Okay for cold weather conditions, multifuel (same cooker for different destinations) and lightweight.
One 450g Primus Winter Gas is enough for 1 week for boiling snow for 2 meals and 1 tea every day. During my 12-day expedition trip, I consumed 728 g of Primus Winter Gas (~61 g / day). One day = 2 meals without coffee/tea. The average temperature was -5°C.
This is how my winter expedition cooking gear looks like:

Gas
LPG
Best heat to weight output. The typical 80% butane / 20% propane mix does not work well in cold weather conditions, use pure propane instead or isobutane.

Butane/Propane gaz canisters are not efficient in low temperature / high altitude unless using winter gas, be aware that not all canisters contain the same mix, that not all destinations have canisters, not all destination recycle or re-use canisters, and that there is different type of connections to the cooker. I now use liquid fuel / white gas because it works at any temperature / pressure, it can be found worldwide, and I can just throw or recycle the bottle of fuel with the classic household waste. Indeed, the canister should only be disposed in a specific centre or a reseller.
Put the canister upside down for better performance: Turn down the control valve as low as possible. Now hold the gas cartridge and turn it upside down slowly and very carefully. While doing so, you must never lift the cartridge higher than the stove itself to avoid a sudden burst of flames. Source: Zenstoves.
Whitegas
Use whitegas (not white spirit) if available (aka Coleman Fuel, Naphta, Primus Power Fuel, Optimus Artic Fuel, essence C – which contains Hudrocarbons, C6-C7, n-alkanes, isoalkanes, cyclics, <5% n-hexane), other fuels like gasoline, kerozene/kerozine (essence F), jet(-A) fuel, benzine (not benzene) or paraffine can be used, but lead to obstructions in the fuel line and nozzle as well as more soot. Never use leaded gasoline as it is poisonous. True white gas is gasoline without additives. Source: Zenstoves. Contrary to LPG, liquid fuel is not pressurised. Basically, LPG is forbidden and liquid fuel is allowed on board commercial flights but you should check the specific company/country rules.

Methylated spirits, shellac thinner, marine stove fuel, liquid fondue fuel, chafing dish fuel (Alcool à bruler 90° in French) contains mainly Ethanol and Methanol which makes the alcohol toxic. Ethanol-based fuel is only good for pre-heating a multifuel stove.
Water Precautions
Source
The worst in New Zealand is actually your stupidity… and infected streams. So avoid animal grazing areas. Microbes are stored in sediment, so avoid disturbance of lake beds when filling water bottles. Avoid drinking untreated water from any surface source when the water is visibly cloudy due to fine sediment or when it is rainy (capturing rainwater on a tent fly – details below – would be a safer option under wet conditions.) Water from lakes, remote from river inflow, will usually be safe owing to sunlight disinfection and sedimentation. Vegetation cannot grow where they are constantly submerged, so when the water level encroaches on this terrestrial vegetation, that indicates the state-of-flow is high, and is best avoided for drinking.
How I get rain water from my tent fly:


Treatments
Treat or double treat water if in doubt. For example, chemically treat first, then stand the transparent plastic bottle on sun during lunch for an extra UV treatment, and use the more doubtful water for cooking only (because it had been boiled in addition.) Usually, I treat water with DCCNa tabs (f.i. Aquatabs and Micropur Forte MF 1T). Notice that I would not use the Micropur Tabletten MC 1T since it just keeps water drinkable, but doesn’t kill existing bacteria/virus.
I prefer chemicals (f.i. Aquatabs, Micropur Forte MF 1T) rather than filter treatment because DCCNa (Sodium Dichloroisocyanurate Dihydrate) is more efficient and lightweight compared to a filtering straw. The swimming pool taste of chemicals is not that bad and reminds me that finding a clean water source – that doesn’t need treatment – is important. Notice that the Micropur Tabletten MC 1T does not contain DCCNa, the chemical killing bacteria/virus.
Diseases
- Giardia: symptoms are diarrhea, gas, stomach or abdominal cramps, nausea, dehydration. It appears after 1-3 weeks after drinking bad water and can last 2-6 weeks; medication can decrease that time. Sources are parasites from cattle, sheep, cats, dogs, rats, possums. Notice that the highest rate is in central North Island and crystal clear streams in the Tongariro may be infected.
- E. coli: symptoms are the same as Giardia plus vomiting. Sources are bugs that could be lurking in backcountry water source, especially sewage, stormwater runoff, animal waste.
Waste
Avoid spreading bad stuff and reduce flies, bury toilet waste more than 50 m away from water sources and busy areas. Do not wash hands directly in water sources.
Coffee
According to a Wilderness Magazine reader survey, 4 out of 5 trampers carry chocolate and more than 50% carry tea and coffee (based on 900 replies.) A hot drink is a hunger break, it saves food! I love coffee but I could not enjoy raw coffee at the beginning, I needed some milk and tasty honey (or sugar). My recipe for one super large cup is:

Mix milk powder with cold water since it does not dilute as well in hot water.
My taste changed later on. I used to drink Mocha while wwoofing for Roger. I only drink Flat White and Long Black since then. I do not like much sugar anymore. Really tasty Bean Bags or fair trade organic instant coffee (4 g ≈ 2 tsp + 250 mL boiled water) can be found in most supermarket if you pay the price. JetBoil is great but the coffee press is a gadget, I would rather use a bean or tea bag or instant coffee instead. Also, if the JetBoil is not well clean, coffee may taste weird… so the best is to have a cup just for coffee and water.
Note about caffeine: found in black and green tea, chocolate, cola and coffee, caffeine prolongs the action of adrenaline, increases pain and stimulates the action of the heart muscle. So it could be used as stimulant when feeling tired. Do not drink more than three cups a day. Prefer coffee with caffeine since “It perks you up when you’re feeling a bit lackluster, it can alter your perception of fatigue, and might even enhance performance.” Kathy Fouhy
Also, shortbreads are good with coffee!
Breakfast
Porridge
I had my first porridge based on a powder mix thanks to free food left in a hut, it was a labeled plastic bag with coconut milk powder, cacao, dates and chia seeds. It was pretty good and the friendly tramper inspired me to make my own tasty breakfast.
Ingredients for one tramper (140 g per serve, including bag):
- 100 mL / 50 g rolled oats
- 6 heaped tsp / 30 g almond (or coconut) milk powder
- 4 tsp / 15 g chia seeds
- 1 heaped tsp / 5 g linseed, sunflower, squash (or almond) ground
- 3 g whole freeze dried raspberries
- 5 g whole freeze dried blackberries
- 8 g whole freeze dried blueberries
- 2 tsp / 7 g dried goji berries
- 7 g shredded coconut
- (150mL boiled water)
Topping:
- 5 g white chocolate pieces
- 5 g dark chocolate pieces
Freeze dried fruits have the taste and nutrition of fresh fruits but they are expensive (NZ$11/40g) and hard to find. You can replace with 4 heaped tsp dried fruits to the mix (cranberries, white mulberries, black mulberries, goji berries) but it would be less nutritive and sweeter.
Oats are filling. Enough to forget food for a while and focus on the real adventure. But a full stomach moves slowly, so too much oats is wrong.
Before tramping: Pack the dry mix into a labeled, re-usable and resealable bag. Indeed, food rationalization is critical to avoid shortage. I try not to waste plastic but a paper bag is too fragile for the tramper’s standard.
In camp: Add boiled water, stir well and enjoy! If possible, simmer for a couple of minutes to allow the oats and the freeze dried ingredients to suck more water.
The Anton’s Porridge: peanut butter, rolled oats, ground cinnamon, milk powder. Anton took peanut butter very seriously, other would prefer Nutella, other would take both, with some maple or golden sirup, cacao powder, NZ apricot… It’s healthy if you are active!
Super Sweet Scones
You want to impress trampers in hut? Just bake scones. I actually feel like a real man when I can bake scones in the middle of nowhere. You want to be considered as a serious tramper? Baking scones, walking off-track, carrying a PLB and letting know your intentions is an impressive combo.

Ingredients for three sweet scones:
- 150 mL plain flour
- 1 tsp baking soda
- 2 heaped tsp milk powder
- 2 tsp cacao powder
- 2 heaped tsp brown sugar
- 2 heaped tsp raisins
Before tramping: Pack the dry mix into a labeled, re-usable and resealable bag.
In camp with the JetBoil cooker equipped with its frying pan extension and a frying pan:
- Gradually add cold water to the dry mix to have a soft texture and stir well.
- Drop the soft texture into a cold pan (the more the thicker).
- Fry pan 1 min on one side.
- Flip and fry the other side for 30 sec.
- Turn your cooker off.
- Wait a few minutes on pan (it will continue to cook off the heat).
- Add topping like dark and white choc pieces.
- Enjoy!
- Repeat process from step 2 to cook the other 2 scones.
Notes:
- Avoid chocolate in warm weather condition.
- Heat intensity with the JetBoil Zip is not really possible, you may want to upgrade to the simmer version if you plan cooking more gourmet meals requiring precision cooking.
- It is easier to handle the texture with less water.
- You can bake pancake if you add more water to the dry mix.
- Topping could be anything, like maple syrup and bananas or peanut butter.
Lunch
Anton – the fellow tramper – used to skip lunch, and had mini snack breaks instead. Indeed, I realised that lunch is the less important meal of the day, and one or two snack breaks are enough to pump me up. This section gathers bread-based recipes for a savoury break. Best served warm, I would cook in camp and would not store fresh bread.
Savoury Scones
Ingredients for three savoury scones:
- 150 mL plain flour
- 1 tsp baking soda
- 2 heaped tsp milk powder
- 4 heaped tsp Olive Dukkah
Before tramping: Pack the dry mix into a labeled, re-usable and resealable bag.
In camp: Follow the Super Sweet Scones process. For extra taste and fat, add 3 tsp olive oil to the soft texture and oil the fry pan for a crispy taste. Oil also helps cooking deeper in the scone. Topping could be cheese (40 g / 3 scones) and Vegemite (1 tsp / scone). Vegemite / Marmite repeal sandflies, they might not like vitamin B in blood. Vegemite has a unique taste, people say that you love it, or you hate it. I love it, especially in the tube format, easy to manipulate. Yogurt powder tastes like cheese, so it’s a lightweight and durable alternative.
Olive Dukkah is great with savoury scones and pasta, it’s light, tasty, dried, with 100kJ/5g, composed of:
- 40% dry roasted nuts (cashew, almond, hazel)
- Sunflower, sesame, pumpkin seeds
- Spices
- Olive powder
- Salt
Notice that cooking three fancy scones consumes less gas than basic pasta and offer countless possibilities. Indeed, you can bake scone, pancake or flat bread depending on the amount of water you add to the dry mix.
Just Flat Bread, aka Parathas
The recipe requires no more than 3 ingredients:
- 60g plain flour
- Some olive oil
- (Pinch of kosher salt)
It is enough for a 15cm-wide, ½cm-thick flat bread.
Instructions:
- Mix together the flour, (the salt) and a teaspoon of olive oil.
- Gradually add some water, and keep stirring with your hands. Result is better by stirring longer than adding more water. You should have a homogeneous paste.
- Flatten the paste.
- (add some Halloumi-style cheese and fried garlic if you want a cheese & garlic naan. I would usually prefer adding some Za’atar, which is a mix of herbs, seeds, spices, and often salt. It depends if you prefer the Indian or the Arabic style)
- Blend in four to form a triangle.
- Flatten again as thin as possible.
- Drop onto the frying pan.
- Cook for 1 minute on medium-heat.
- Return and cook for an other minute. Spread some oil on top at the same time.
- Return and cook for 3 minutes. Spread some oil on top at the same time.
- Return and cook for 3 minutes.
Wrap
Easy and tasty:
- Flat wholemeal bread from the supermarket or Parathas (see recipe above)
- Blue cheese (20g / wrap)
- Vegemite
Wrap bread from the supermarket is the easiest solution and can be packed for up to 3 days, but baking your own bread is so much fun!
Snack
Raw nuts are healthy for tramping but you may prefer the super tasty roasted and salted nuts with caramel flavour, yet less healthy but the most important is to like it. It can be found in bulk in many supermarket (in New Zealand). Snack must be rationalised because:
- You tend to eat more snack than expected.
- Rations in resealable plastic bags take less space than off-the-shelf packages.
- You could mix different things in a single daily ration.
The process of rationalisation could be like that:

Note: Pure Delish is the only NZ-wide brand baking large energy bar (400g). That is a great way to reduce plastic waste.
Snack ideas:
- Sweet and dried slices (1 kiwi slice + 1 mango slice + 1 apple slice) + 1 snack ration
- Muesli bar (see recipe below)
- A couple of shortbread (see recipe below) with coffee
- scroggin mix (see recipe below
Scroggin Mix
For 165g of snack (the amount of serves depend on your hungriness, but I would say 2 serves):
- 30g cranberries
- 30g black mulberries
- 30g white mulberries
- 30g almond
- 30g cashew nuts
- 6 brazil nuts
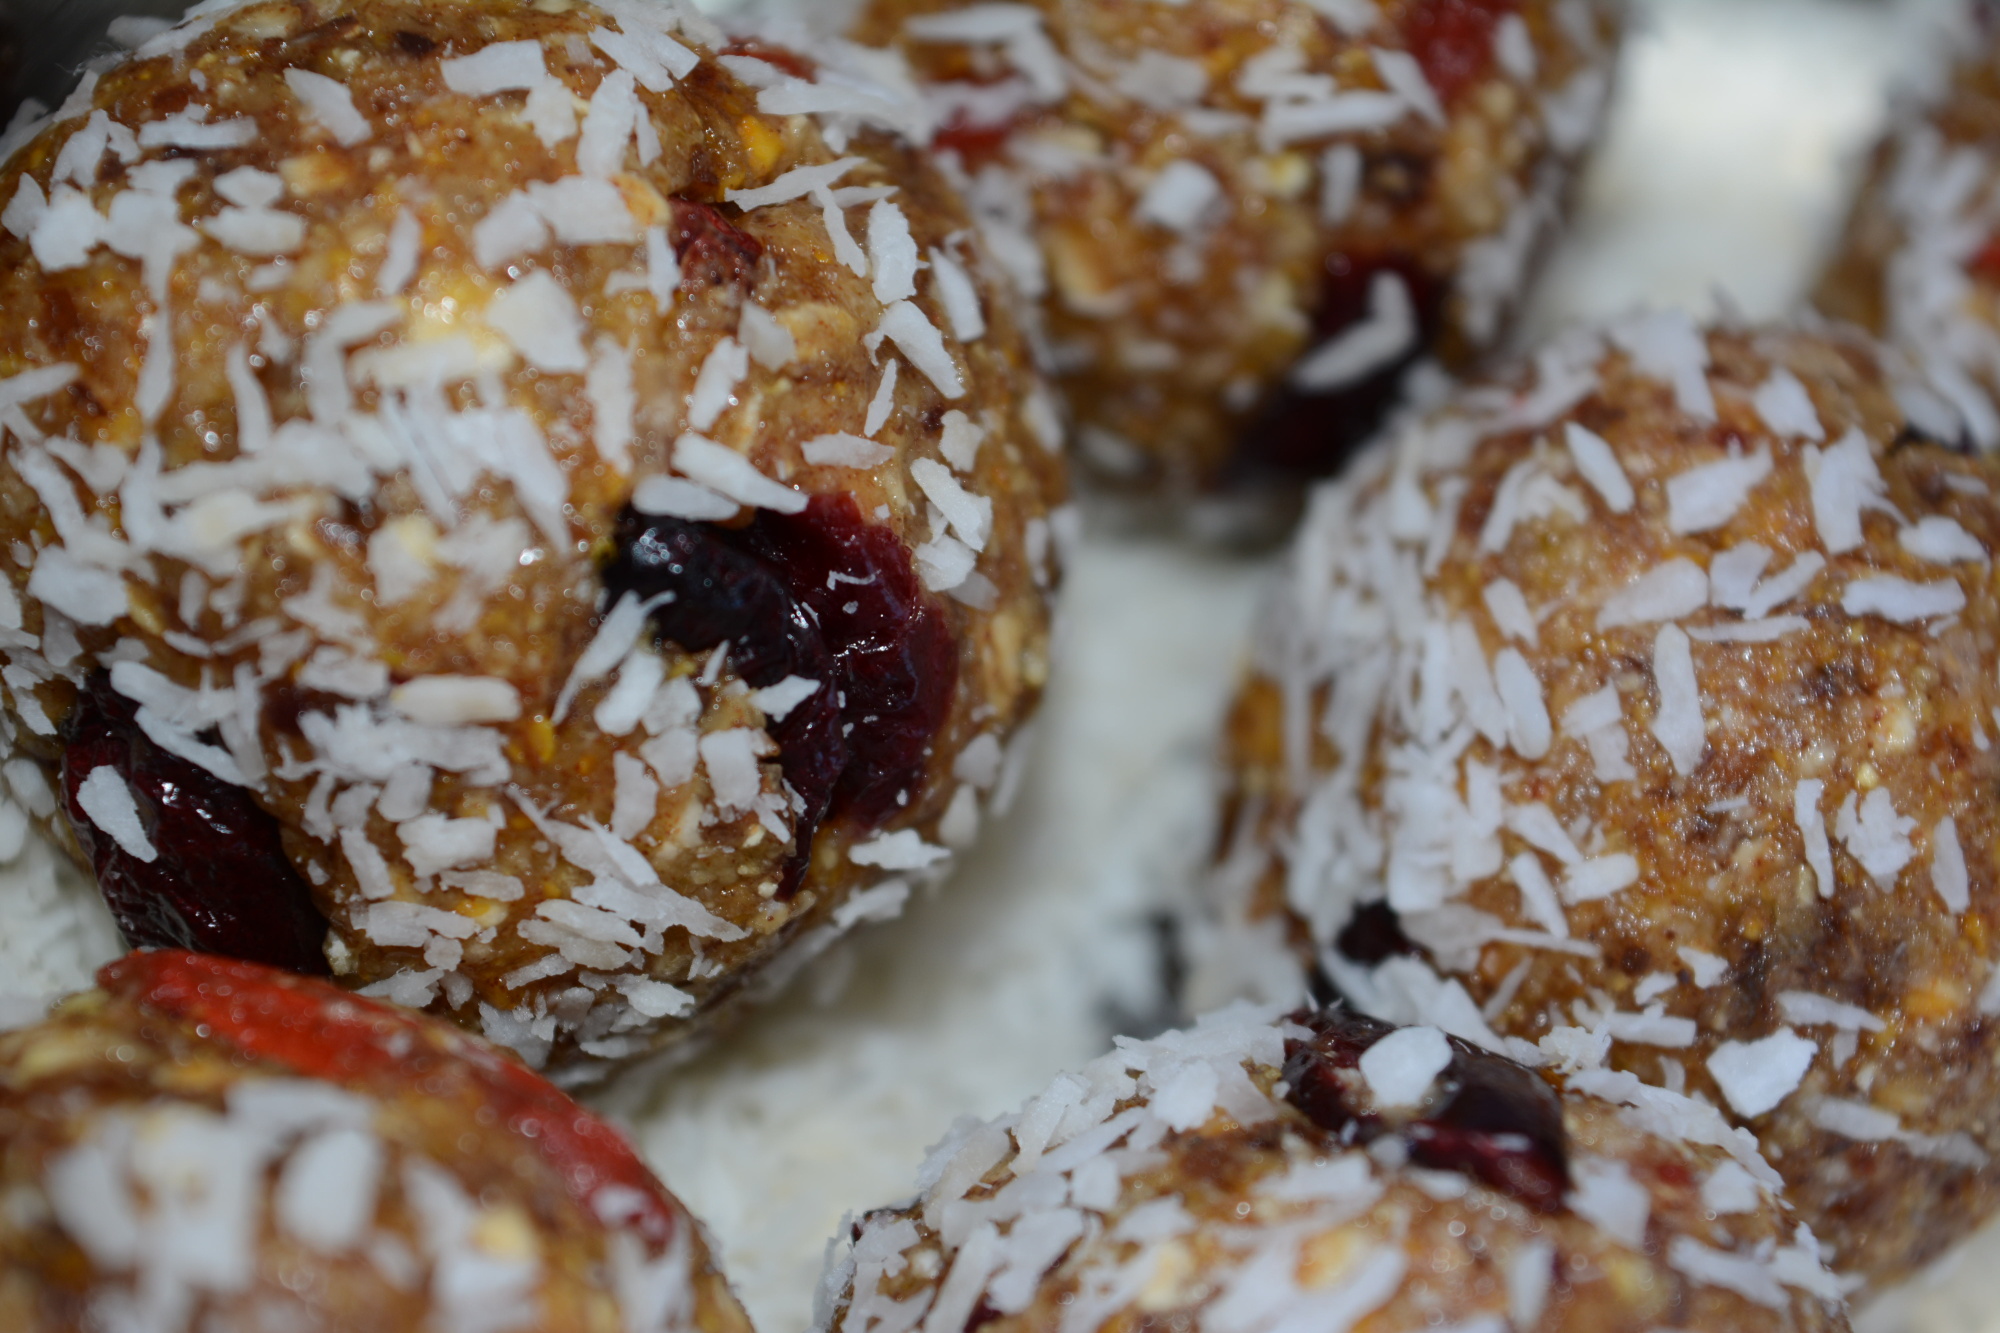
Energy Balls

Ingredients for about 16 (543 g) energy balls (34 g each):
- 200 mL / 96 g rolled oats (filling, inexpensive)
- 4 tsp / 15 g goji berries
- 4 heaped tsp / 30 g linseed, sunflower, squash (or almond) ground
- 5 heaped tsp / 25 g (hazel)nut chunks (or butter)
- 5 tsp / 48 g tahini
- 7 heaped tsp / 135 g honey
- ¼ tsp kosher salt
- 13 / 100 g dates mixed into paste
- 4 tsp / 18 g almond powder
- 2 tsp orange blossom water
- 3 tsp / 10 g desiccated coconut
- 4 tsp / 30 g cranberries
- 29 g white choco chunk (as ball heart)
- 20 g desiccated coconut (all around the ball)
Instructions:
- Place all of the ingredients in a large bowl (except the last 2 ingredients). Stir to combine. If the mixture seems too wet, add a bit more oats. If it’s too dry, add a bit more butter. It should resemble a somewhat sticky dough that holds together when lightly squeezed. Place the bowl in the fridge (or river stream) for 30 minutes to set (this will make the balls easier to roll later on).
- Remove the bowl from the fridge and portion the dough into 1-inch balls.
- Enjoy!
- Store leftover energy balls in an airtight container in the fridge for up to 2 weeks or freeze for up to 3 months.
Shortbread
Ingredients for 13 shortbread (319g):
- 100g fresh butter
- 150g plain flour
- ½ tsp kosher salt
- 50g golden syrup
- 30g LSA ground
- 20g chia seeds
- 2 tsp orange blossom water
- 1 tsp ground cinnamon
Instructions:
- Preheat the oven at 150°C.
- Roughly chop the butter in a bowl.
- Add the flour to the butter and mix with your hands.
- Add the golden syrup to the mixture and stir by hand to have a homogeneous paste.
- Line a baking dish with baking paper.
- spread small 1-cm thick biscuits on the lined baking dish.
- Bake for 20 minutes in the oven.
Idea:
- Add tahini
Pasteli Bars
The pasteli bars are yummy and resist a wide temperature range (+25°C as well as -10°C).
Ingredients for 15 (170 g) Pasteli Bars (11 g each):
- 100 g honey
- 100 g grilled white sesame seeds
- 20 g linseed, sunflower, squash (or almond) ground
- 60 g tahini
Instructions:
1. Line a baking tray with greased baking paper. It is practical to use mini loaf tins so that it is well shaped.

2. In a dry skillet over medium heat, toast the sesame seeds lightly if they aren’t already grilled. Transfer them to a plate to stop the cooking process and set aside.


3. In the same skillet, pour the honey and over medium heat bring it to boil. As soon as the honey starts boiling add the sesame seeds, the LSS/A ground, the tahini, all at once to the skillet and stir continuously, - for 3 to 6 minutes.


4. Immediately transfer the pasteli batter to the lined baking tray, cover with one more greased baking paper sheet and with the bottom of a small skillet press to flatten the batter.

5. While still warm, cut the flattened pasteli into bars. When cold, it can then be stored for many weeks in a biscuit container between several layers of wax paper.

Panforte
The panforte is a long-lasting and virtually indestructible snack. It is baked at home and packed already cooked. The recipe is based on the great New Zealand Backcountry Cooking book.
Ingredients for quite a lot:
- 250g dried fruits
- 250g mixed raw nuts
- 4 tsp ground cinnamon
- 100mL plain flour
- 100mL chopped dark chocolate
- 80g brown sugar
- 55g honey
- (orange blossom water)
Instructions:
- Roughly chop the nuts but leave them quite chunky so you can see the pieces when the panforte is cut.
- Mix together the fruits, nuts, ground cinnamon, chocolate, and flour.
- Line a cake tin with baking paper.
- Preheat the oven to 180°C.
- (Add some orange blossom water to the mix.)
- Boil the sugar and honey with 1 tbsp water for 1 minute.
- Pour the honey syrup over the ingredients and stir – be strong and fast!
- Press (1-inch thick) into the prepared tin and bake for 20 minutes.
- Cut into slices so that you don’t eat all the first day!
Date & Walnut Loaf

This loaf is less compact than the panforte and may require a plastic box to carry. It is baked at home and packed already cooked. A drizzle of maple syrup or honey is great. The recipe is also based on the New Zealand Backcountry Cooking book.
Makes 1 loaf:
- 1 cup chopped dates
- 1 cup sultanas
- 1 cup walnuts, roughly chopped
- 3 tsp ground cinnamon
- 1 cup sugar
- 50g butter
- 1½ cup boiling water
- 2 cups plain flour
- 2 tsp baking powder
Instructions:
- Mix together the ingredients except the flour and baking powder, then set aside to cool.
- Preheat the oven to 180°C.
- Sift the flour and baking powder.
- Pour the flour in the fruit mixture. Mix together thoroughly.
- Place in a greased, lined 10x25cm loaf tin, and bake for 50-60 minutes.
ANZAC Slices
The recipe is like the ANZAC biscuit filled with rich ingredients. The ANZAC biscuit is the most famous biscuit in New Zealand and Australia and used by the joint army of the same name – just “ANZAC” without “biscuits.” I haven’t find the best recipe yet, hope you will share it to me! Also, think about different shapes: biscuits, slices, squares, etc.
Dinner
Mashed Potatoes
Ingredients for one tramper (144 g per serve, including bag):
- 34g mashed potatoes
- 4 heaped tsp / 20 g almond milk powder
- 3 tsp / 20 g green lentils
- 6 tsp / 30 g red lentils
- 1 tsp dehydrated chopped chives
- 3 slices / 12 g dehydrated chopped tomatoes
- 1 tsp curry
- 7 g dehydrated mushrooms
- 2 heaped tsp / 5 g freeze dried caramelised red onion
- ½ tsp freeze dried garlic
Before tramping: Pack the dry mix into a labeled, re-usable and resealable bag.
In camp: Put the dry mix into 250-300 mL boiled water, stir well (and simmer for 3-4 minutes if possible) and wait 10 minutes.
Couscous
Couscous is fast to cook, tasty and compact.
Ingredients for one tramper (132 g per serve, including bag):
- 80 mL / 60 g wholemeal couscous
- 1 tsp spice (paprika, curry, etc.)
- 3 tsp / 10 g sliced grilled almonds
- 2 / 18 g chopped dates
- 2 / 16 g chopped NZ apricots
- 4 heaped tsp / 25 g sultanas
- 2 heaped tsp / 5 g freeze dried grilled mixed peppers
Before tramping: Pack the dry mix into a labeled, re-usable and resealable bag.
In camp: Add 200 mL of boiled water to the mix, stir well and enjoy!
Pasta
A small and lightweight frying pan is super useful.
I eat my pasta with pine nuts grilled on a frying pan, walnut, basil and a pesto sauce – only for the first three tramping days due the fresh pesto mix. Fresh solid cheese also strengthens taste (f.i. blue cheese, parmigiano). For longer trip and optimal meal, prefer freeze dried cheese.
My favourite pasta are the Pam’s Finest Dry Tortelleni (in New Zealand), 125g / serve, but any fast cooking pasta is okay (90g per serve).
I do not carry fresh fruits or vegies – too heavy. Capsicum, ginger and garlic are the exceptions. Those lightweight ingredients last long and boost taste.
Butter or olive oil add extra taste to pasta but it makes cleaning tricky. In order to absorb grease, use half tsp baking soda, 2 drops of water, and 3 fingers. Also, avoid any leak of your bottle of oil.
Tramping 14 Days Non-Stop
Overview
During my winter expedition Whitish Dusk, I carried 14 days of food including porridge, snack, and dinner in a 5 kg dry sac. My rations were both tasty and feeling enough. Some ingredients – such as freeze dried blueberries, dehydrated mushrooms and tomatoes – added a real fresh taste to the meal but they are expensive. Fair trade organic coffee was also important to me! I only used recipes complying the following requirements:
- long-lasting,
- good nutritional value,
- tasty,
- compressible,
- stored and used in sub-freezing temperature,
- snack eatable with mittens.
So, it wasn’t just a matter of calories!

As you can see in the above picture (that you can zoom on click hover), the top row is porridge (1973 g), the middle row is snack (1112 g of energy balls, Pasteli bars, and dried fruits) and fair trade organic instant coffee (100 g), and the bottom row is dinner (7 serves / 920 g of couscous mix, and 7 serves / 1006 g of mashed potatoes mix.)
I compartmentalised meals (breakfast / snack / dinner) into coloured cotton bags that I put together into a dry sac.

Nutritional Analysis
Definitions
There are three main classes of food and all provide energy:
- Proteins are important for the repair of muscles and tissues. Sources of proteins include meat, cheese, eggs, and milk powder;
- Fats have the highest energy content per gram and are slowly digested. Sources of fat include butter, bacon, cheese, salami, chocolate and full cream milk powder. Reduce saturated fat and trans fatty acid intake. Avoid fried food, heated oils, coconut;
- Carbohydrates are rapidly digested and provide almost instant energy. Foods rich in carbohydrates include sugar, honey, bread, muesli, oatmeal, rice, macaroni, spaghetti, sweets and dried fruits. Sugar, pastries, cakes, biscuits give a sense of fullness with calories but very little nutritional value (empty calories). So if you love shortbread in you coffee, keep it as a snack, not a real meal.
Based on nutritional labels from raw ingredients (not taking into account the boiling / cooking process), the daily intake is as follow. Notice that the analysis has been done after the hike.
Daily Intake For Breakfast
- Energy: 577 Kcal
- Protein: 23 g
- Carbohydrate: 61 g
- From Sugars: 16 g
- Fat: 24 g
- From Saturates: 10 g
- Fibre: 22 g
- Salt: 0.77 g
Daily Intake For Snack
- Energy: 244 Kcal
- Protein: 6 g
- Carbohydrate: 80 g
- From Sugars: 73 g
- Fat: 13 g
- From Saturates: 3 g
- Fibre: 4 g
- Salt: 0.016 g
Daily Intake For Dinner
- Energy: 438 Kcal
- Protein: 18 g
- Carbohydrate: 71 g
- From Sugars: 24 g
- Fat: 7 g
- From Saturates: 1 g
- Fibre: 17 g
- Salt: 0.5 g
Total & Conclusion
According to the Harris–Benedict equations revised by Mifflin and St Jeor in 1990, the BMR for men is:
(10 × weight in kg) + (6.25 × height in cm) - (5 × age in years) + 5
The BMR for women is:
(10 × weight in kg) + (6.25 × height in cm) - (5 × age in years) - 161
The amount of daily kilocalories is the BMR (Basal Metabolic Rate) multiplied by the Physical Activity Level which is about 2.2 for a vigorously active person. In my case, I would therefore need about 3,400 kcal in order to keep my weight. It was actually about 1,259 and that explains my weight loss.
Considering the macronutrients, the theory is:
- Carbohydrates: 4 kcal/g, 50% of total kcal
- Proteins: 4 kcal/g, 15% of total kcal
- Fats: 9 kcal/g, 35% of total kcal
- Fiber (complex carbohydrates): 14 g / 1,000 kcal
The problem raised by the above table is that a sufficient amount of carbs, proteins, and fats require heavy meals impossible to carry. Therefore, the idea is not to reach 3,400 kcal but to have fair enough with a good balance of macronutrients.
The actual daily intake:
- Energy: 1259 Kcal
- Protein: 47 g
- Carbohydrate: 212 g but should rather be 157 g
- From Sugars: 114 g
- Fat: 43 g but should rather be 49 g
- From Saturates: 14 g
- Fibre: 43 g
- Salt: 0.6 g
Pretty good but more fats and less carbs would be even better. I lost weight but haven’t felt hungry a single moment though. Symptoms may appear if thru-hiking and the idea would be to optimize the serve weight to nutritious weight ratio (as nutritive as the following industrial meal) or drop food more often to carry less.
Notice that the balance of carbs/proteins/fats is on a daily basis and I would manage to have a meal richer in carbohydrates for lunch, and richer in proteins for dinner.
Now let’s compare for example my mashed potatoes mix with the industrial Beef Teriyaki by Backcountry Cuisine (which used to be my favourite meal before I did my own and before I became vegetarian):

The nutritional information is reduced to 100 g of dried mix. Nutritional Value(100g of dried mix) = [Nutritional Value(per serve) x serves per package x 100g] / pack weight.
Mashed Potatoes vs Beef Teriyaki®:
- Energy: 281 Kcal vs 433 Kcal
- Protein: 16.7 g vs 20.6 g
- Carbohydrate: 40.5 g vs 51.9 g
- From Sugars: 5.7 g vs 15.9 g
- Fat: 4.4 g vs 16.1 g
- From Saturates: 0.9 g vs 5.0 g
- Salt: 700 mg vs 1359 mg
Notice that the nutritional information of the mashed potatoes mix is based on the nutritional information of its composition, while the Beef Teriyaki had its chemical analysis after reconstitution. I mean, I am probably comparing apple to orange, so take it with a grain of salt.
I have to admit that this industrial freeze dried meal is more nutritive, but doing my own mixes waste less plastic, is more compact, certainly vegetarian, made from many organic ingredients – no added Maltodextrin in my recipes –, cheaper, without additional food colouring, and filling enough!
Other ideas of improvement:
- Prefer ground nuts or nut butters instead of whole nuts. See here for the why.
- Try rich ingredients like ground soy proteins!

Comments
No comments yet. Be the first to react!